Free Web Hosting Management with Virtualmin
 Few years ago I was looking for a virtual host management system, that’s when I came across Virtualmin. The features satisfied my requirements and of course you can’t beat the free, price wise :). I’ve been using it in an environment with 100+ virtual hosts since then, and don’t have any regret on my choice. It’s running all these years without any problem.
What is Virtualmin
Virtualmin is a free and open-source virtual hosting management system designed to make virtual hosting quick, reliable, and secure. It’s a Webmin module, which supports the creation and management of Apache virtual hosts, BIND DNS domains, MySQL/PostgresSQL databases, and mailboxes and aliases with Sendmail, Postfix or Qmail. It utilizes existing Webmin modules for these servers, and works with any existing system configuration, rather than needing it’s own mail server, web server and so on. There’s also a commercial version of Virtualmin that you’ve to pay for, called Virtualmin Pro, which includes some extra features and support.
Virtualmin Installation
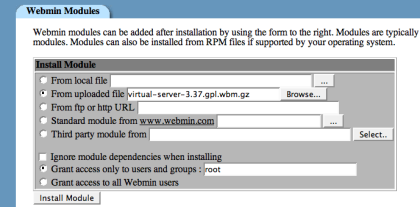
To install the Virtualmin module, first you need a working Webmin, after you’ve webmin installed it’s pretty straight forward. Download the latest version of Virtualmin from Virtualmin’s site and install it from the webmin’s Modules installation interface.
Login to Webmin as root –> Webmin Configuration –> Webmin Modules
Choose the Webmin installation file and click Install Module
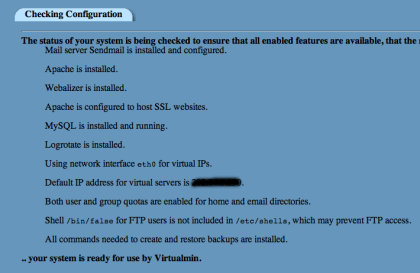
After you complete the installation, click on Virtualmin Virtual Servers (GPL) which will lead you to the next interface, where you’ll need to re-check and refresh configuration. Click on Re-check and refresh configuration button. This is to make sure that all the required softwares are installed and configured properly. This step will check for Apache, Webalizer, MySQL, Sendmail and other softwares installation and configuration. If it finds any problem it’ll report and give you an option to correct it. If everything is ok, you’ll see a message saying …your system is ready for use by Virtualmin.

That’s it, you’ve successfully installed Virtualmin. Now adding a new virtual host is very easy. During the addition of a new virtual host you can choose the features that you want to have for this virtual domain, e.g. if you’ll use this new virtual host for your WordPress blog then you need a MySQL database too, for that you’ll need to choose Create MySQL database from the Enabled Features list.
Virtualmin Features
Virtualmin is a feature rich hosting management system. Here’s a feature-to-feature comparition of Virtualmin and cPanel (cPanel is compared with Virtualmin Pro, but most of the features are present in free version too). Here’re some features that I find useful:
Single Management Interface
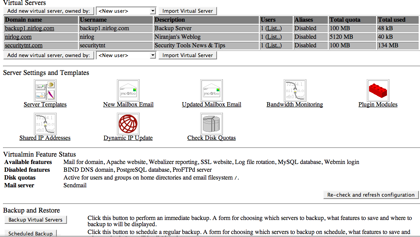
All Virtual hosts can be managed from a single interface. You can see the all the existing virtual hosts and their total allocated quota and usage.
Backup Restore
It’s very easy to perform an instant backup of selected or all domains with a single click.
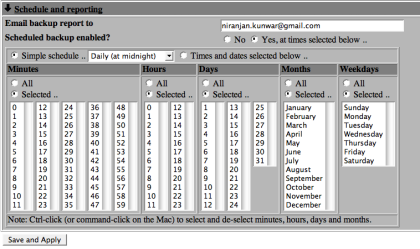
You can choose a simple scheduled backup. E.g. backup daily at midnight and send you the success or failure report to your email address.
The restore is as painless as backup, all you need to do is choose the backup file and click restore.
Bandwidth Monitoring
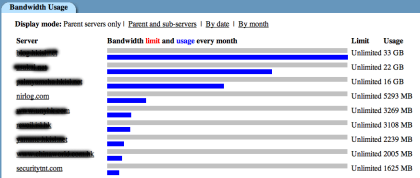
Bandwidth is money. You can conserve it by activating the Bandwidth Monitoring, there’s an option to limit bandwidth usage for each virtual host and you can choose to send an alert to the owner if he’s nearing the capacity. You can also generate a bandwidth usage graph of all virtual hosts.
Configuration
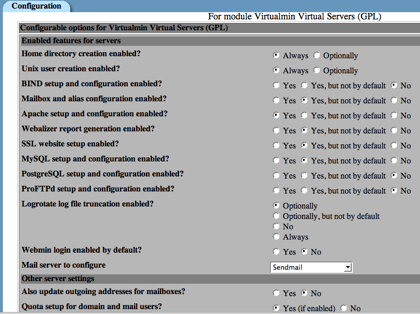
You can fine-tune the Virtualmin for your environment by using the Module Config menu. This is the place to setup default parameters for all the virtual hosts. E.g. you can choose to enable MySQL, but not for all virtual hosts by default, this means when you create a new virtual host you’ll be given a choice to enable or disable MySQL for this particular virtual host. There’re plenty of other configuration options you can do here.


Thanks for the info! There aren’t many GPL hosting software options out there, and even less information on the ones that are available.
lolz, you don’t want this. It is so easy to hack…
Excellent post! Could you go over how Virtualmin GPL is upgraded? I mean, is it done through the command prompt of is there an “update now” button like that have in plesk? Thanks.